Huawei Y9 2019 is one of the most successful smartphones for Huawei in the mid-range price segment. A 6.5-inch FHD+ display, octa-core Kirin 710 SoC, 16MP + 2MP dual rear cameras, and a 4000mAh battery are the highlights of Huawei Y9 2019. As the smartphone is older now, the users have been looking to perform a backup. Unfortunately, creating a backup of all your data on Huawei Y9 2019 is not a simple task. So, here we have detailed steps which guide you on how to Backup Data on Huawei Y9 2019 using the HiSuite.

Performing backup of phone data is recommended as there is a high possibility of data-loss while upgrading your phone, factory data reset, Virus impact and more. To make the backup process easier, Huawei has introduced its own Windows/Mac application called HiSuite. It is an Android smart device manager for Huawei and Honor smartphones letting you manage photos, contacts, videos, applications, SMS, and more importantly perform backups.
To perform a backup of your Huawei Y9 data, you need to connect the device with PC using a USB cable and hit the ‘Backup’ option on your HiSuite software. The same thing has been explained in the following tutorial. Without looking around, follow the below steps to backup data on Huawei Y9 2019 using the HiSuite.
Also: How to Update Huawei Y9 2019 using the HiSuite
Download HiSuite for Windows/Mac
How to Backup Data on Huawei Y9 2019 using the HiSuite
1. Download and install the HiSuite software on your computer.
2. Connect Huawei Y9 2019 to your PC using a USB cable.
3. Launch the HiSuite software.
4. The software will automatically recognize your device. You’ll see device model number on the screen.
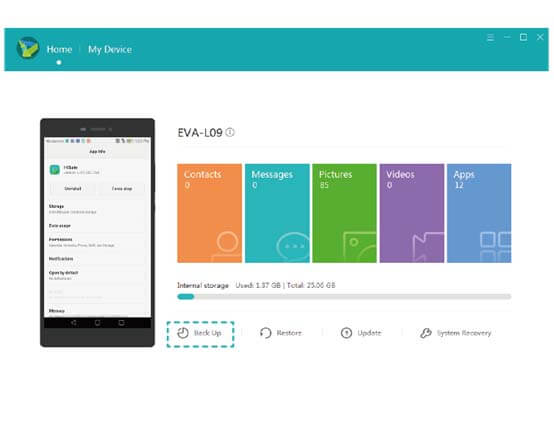
5. Tap the ‘Back Up’ button.
6. Now you need to select where you want to have your backup or live it in default directory in HiSuite directory.
7. Next, select the data which you want to take a backup. You can also choose all from the top right corner to backup everything that the HiSuite can from phone.

8. There is optional to select the last checkbox which reads “encrypt with password”. If you select this, you need to set up a password for your backup file which becomes mandatory to enter while restoring the backup. So, it’s advisable to remain it uncheck.
9. Finally, click on the ‘Back up’ button to start the process.
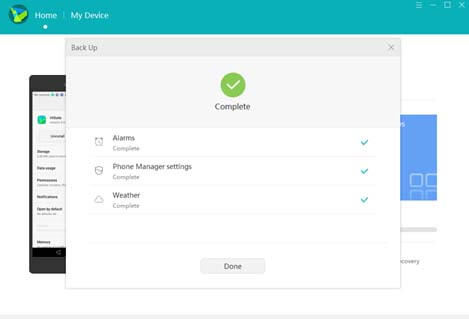
10. One a successful backup, you will be notified with a message: Complete
That’s it! You have successfully created a backup of Huawei Y9 2019 data to your Windows/Mac. In order to restore, simply connect your device with PC and select the ‘Restore’ option on HiSuite software.
Having queries or struck in-between the backup process? Do feel free to comment below. We’ll get back with the most possible solutions.