Huawei Nova 2i is the international variant of Maimang 6 featuring a 5.9-inch FullView display and four cameras. Huawei announced the Maimang 6 for Chinese market in September 2017 and a week later its global version called as Huawei Nova 2i was made official. The Nova 2i packs with some decent specifications making it one of the best value for money smartphones. It came out of the box with Android 7.0 Nougat and soon after it received the Android 8.0 Oreo. With Google’s latest Android 9.0 Pie update is out, many of the users might be wondering to experience this firmware. For all those, here we have brief tutorial to download and install Android 9.0 Pie based OmniROM on Huawei Nova 2i.

Android 9.0 Pie based OmniROM is one of the latest Custom ROM developed by many developers as a group project. Like other custom ROMs, the OmniROM is also based on the AOSP (Android Open Source Project). Huawei Nova 2i users need to download this OmniROM and flash it via ADB & Fastboot tool to experience the all new Android 9 Pie OS. Before you start the firmware flashing, make sure to backup everything to a safer place as the process undergoes factory reset.
To remind you, the Android 9.0 Pie is Google’s ninth iteration of mobile operating system. It brings several new features, performance improvements, and revamped user interface over its previous Android 8.0 Oreo OS. Gesture-based navigation, New Quick Settings UI design, Redesigned volume slider, Advanced Battery with AI Support are some of the highlights of Android 9 Pie firmware.
Without much ado, checkout the below pre-requisites and then we’ll directly take you to the step-by-step guide on how to update Huawei Nova 2i to Android 9.0 Pie firmware.
Related:
- Download EMUI 9 Theme for any Huawei and Honor phone
- Huawei EMUI 9.0 Android Pie Update – List of all eligible devices
Pre-requisites:
- This Android 9.0 Pie based OmniROM is supported only on Huawei Nova 2i [RNE-L01, RNE-L02, RNE-L03, RNE-L21, RNE-L22, and RNE-L23]. Don’t try to flash on any other Huawei/Honor device.
- There should be at least 75% battery level on your device to perform the flashing procedure.
- Make sure Huawei USB Drivers are installed on your device.
- Download and install the ADB and Fastboot tool.
- This procedure undergoes factory reset, so we advise you to perform backup of all your important data.
- Your device should be running on stock EMUI 8.0 with stock recovery installed.
- Enable USB Debugging from settings.
- Bootloader of your device should be unlocked.
Disclaimer: Flashing of custom ROM voids company warranty. We should not help responsible for any damage occurs to your device during or after the flashing procedure.
Download Android 9.0 Pie based OmniROM for Huawei Nova 2i
Download Android Pie GApps Package
How to Install Android 9.0 Pie based OmniROM on Huawei Nova 2i
1. Download the Android 9.0 Pie based custom ROM from above to your PC. Make sure to rename the file to system_img_name.
2. Transfer the ROM file to ADB & Fastboot folder.
3. Connect your device with PC using a standard USB cable.
4. Next, launch Command Window through ADB folder. To do so, you need press SHIFT key and right click anywhere in the ADB folder. Select the option ‘Open PowerShell window here’ or ‘Command window’.
5. Once the Huawei Nova 2i is successfully connect with PC, you need to enter the below command to start flashing the OmniROM.
fastboot flash system “system_img_name”.img
6. It will take few minutes for the flashing to complete. Once done, you need to enter the below command to reboot your device.
fastboot reboot
7. Before the device boots-up to OmniROM, you need to perform factory reset. To do so, you need to press & hold Power + Vol Up at the same time for a while till you see Huawei/Honor logo on the screen.
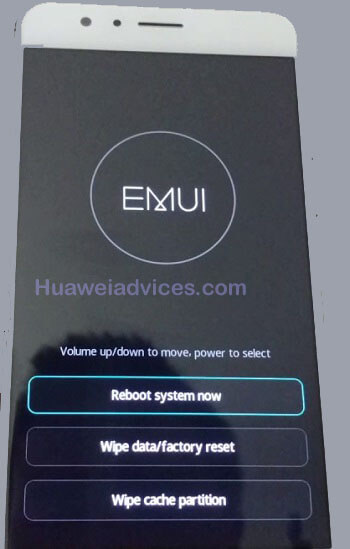
8. Next, tap on “Wipe data/factory reset”.
9. Reboot System. Enjoy!
I hope the above guide was useful in updating Huawei Nova 2i to Android 9.0 Pie based OmniROM. Leave a comment below if you find any difficulty during the installation procedure.
Source – XDA


Hi. I want to ask about this step-by-step guide.
I’m not really clear on how/what to do from step 6 to step 7.
which one should I do first?
enter the command to reboot the device or perform factory reset?
and during flashing, the device should be on or off?
thank you